Loom Dressing Refresher
Please wait for the photos to load
Thank You for choosing me to teach you how to weave. Since I've put my own variation on a couple of the steps I've taught you....you won't be able to find photos of them in any book...so, I thought I'd post some visuals for you to refer back to when you are home trying to remember...
"How the heck did we do that?!!"
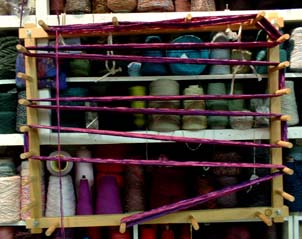
Measure the warp. We start at the top so the cross is eye level. It's easier to catch an error this way. The warp shown is approx. 8 yards long. Our starting peg is the far left peg on the top, horizontal part of the board. The cross is there in the middle of that same row of pegs. (Left handed people might want to try reversing the starting peg to the far right one.)
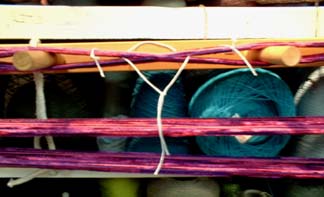
Tie off your cross like photo on right.

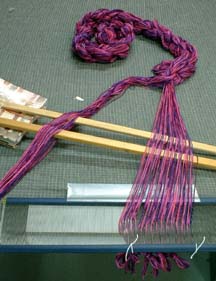
Chain off your warp starting at the bottom. Be careful...always have one hand holding the tension. Some people put additional choke ties at various points on the warp....I do quite fine with out them and prefer not to deal with them later in the procedure.
Tape the reed to the table edge. Insert Lease sticks into cross. It helps to prop one side of sticks up on something so the yarn will slide. Be sure to put slip knot bundles under reed as you thread to avoid accidental un-threading. See the white paper under the reed slightly to the left of what I've already sleyed....that's there so it's easier to see the openings. The gray table cloth does not provide enough contrast.
Bird's eye view of a table loom. Carefully move reed to loom with knot bundles falling between the beater and the castle (heddles). See the lease sticks are still holding the cross in front of the loom. On a floor loom you may want to support them with sticks or string. Now move behind the loom and begin threading the heddles. Tie the warp to the back apron rod being sure that it passes over the back beam.
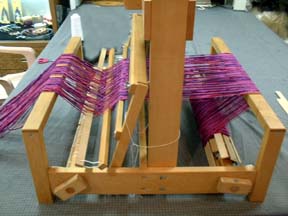

Photo on left shows the proper appearance as you begin to wind onto the warp beam. See the lease sticks are still present in front of the reed where the warp dips down.
You should be inserting warp sticks or stiff paper as you wind on. In the very beginning, use a lot of sticks....then you can hold off and insert sticks every full revolution and half (give or take depending on how many you have to pack in the warp)
When you are all wound on, trim the warp in front of the lease sticks and remove them. Bring the apron rod up over the breast beam and begin tying your warp to the apron.
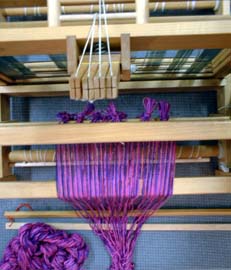
This is where we do that fancy slip knotty thing that, to this day, I have not found illustrated in any book.
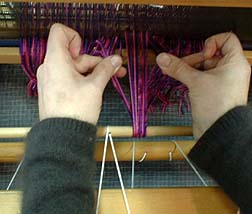
Starting in the middle, pull a group of threads over the apron rod, make a half twist underneath the rod and split the group in half. Pull away from you to tighten (photo on left) and then towards you. Hold both groups in the left hand like photo on right is starting to do.
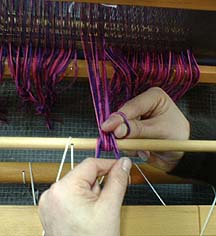
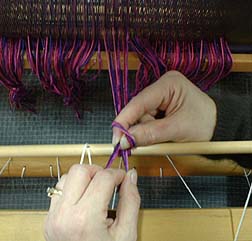
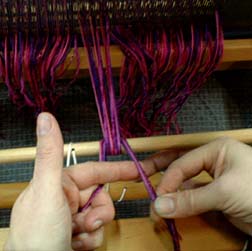
Using your right index finger, twist the right group of threads and then sneak the right thumb into that loop. (center photo) Pinch the left group of threads (photo on right) and begin pulling them into a loop.
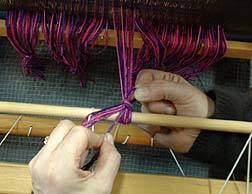
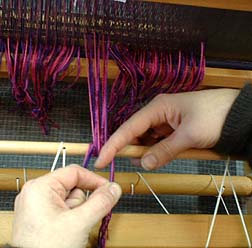
Release your left hand's grip on the left group while your left thumb and index finger pull on the tails of the right group which will tighten the knot. Tie on all groups in the same fashion alternating between left and right of center working toward the selvages. You will likely need to untie and retie various groups to even out the tension across the warp. This is easily done by pulling the tail of the right group to slip out the knot. Pull the tails away from you to tighten and then toward you and repeat the tying of the knot.
Weave in a couple rows of packing material (T.P.) and check for threading errors.
Ta! Da! Start your weaving project!
![]() Return
to the class listing
Return
to the class listing
![]() Return to our front door
Return to our front door